We contract with a company named SmugMug to store, manage and archive photographs and images for the Jones Valley website. Since we started the site in 2004 we have uploaded over 28,000 photos and images as of April 2009. In any give month we have over 25,000 images viewed. The bulk of these images were loaned to me to scan and upload. Unfortunately, I am not smart enough to figure out how to let everyone upload. If you have photos or documents to share please send them to me at the following address and I will scan and return them to you within 48 hours. My mailing address is 5241 Overland Trace, Birmingham 35244.
The images are organized in "galleries" and "sub-galleries" to facilitate navigation and viewing. As of this writing the organization looks like:
Yearbooks
- the first Jones Valley yearbook appeared in 1923,
continued through 1930, stopped during the depression and war and picked up
again in 1946. Within the Yearbook gallery a sub gallery exists for each
published year from 1923-1978.
Graduating Classes
- a sub-gallery exists with photos of the graduating
class from each published yearbook.
Reunions - a
sub-gallery exist for each graduating class we have reunion photos for.
Get Togethers -
we began having monthly luncheons open to all JV alumnus in 2004. You
will find photos of these get togethers organized is sub-galleries by year and
month.
School Days -
you will find old photos taken during school years in this gallery.
There are not sub-galleries but I just can't come up with a way to further
organize this gallery.
Now-a-Days -
in this gallery you will find photos taken of alumnus after the graduated -
mostly current photos.
Family
- just as the name implies, this gallery houses photos
of our families.
Memorabilia -
this gallery is a catch-all for images of newspaper articles, newsletters,
programs etc.
The Woodward News
- Newsletters from the Woodward Iron Company
Band -
Photos and articles related to the band
Staff and Faculty
- Photos of staff and faculty
Facility
- Photographs and articles related to the school building and facilities
Lipscomb
- Photographs and articles related to Lipscomb School
Red Mountain Park
- Photos and articles related to Red Mountain Park
Personal Pages
- Galleries of specific individuals
Sports - Galleries related to
athletics
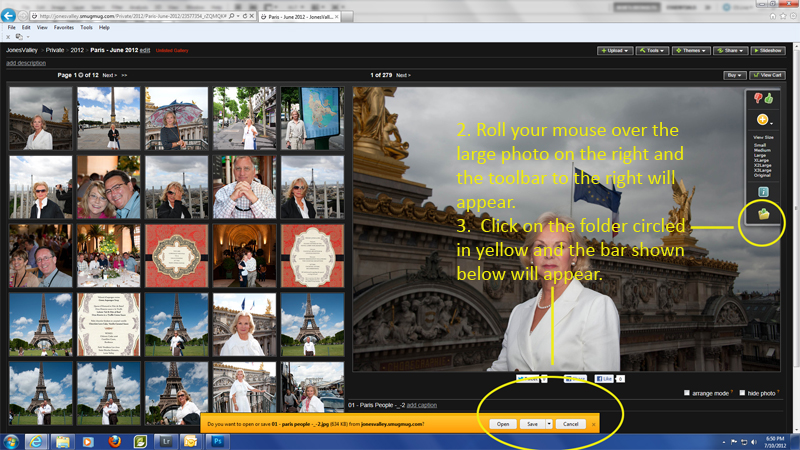
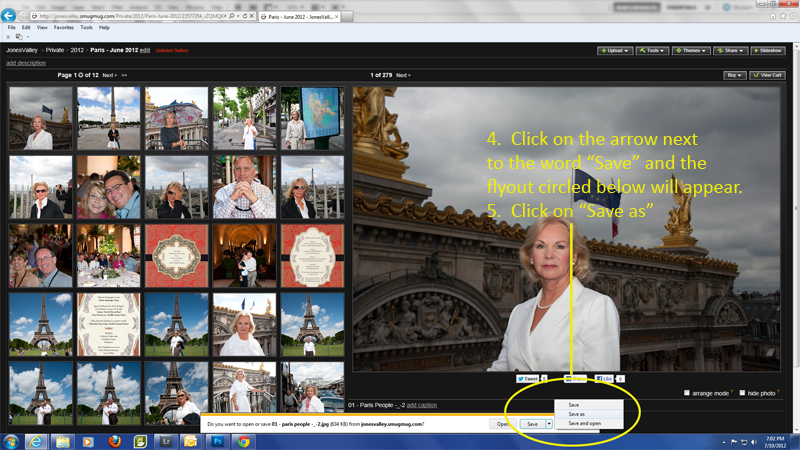
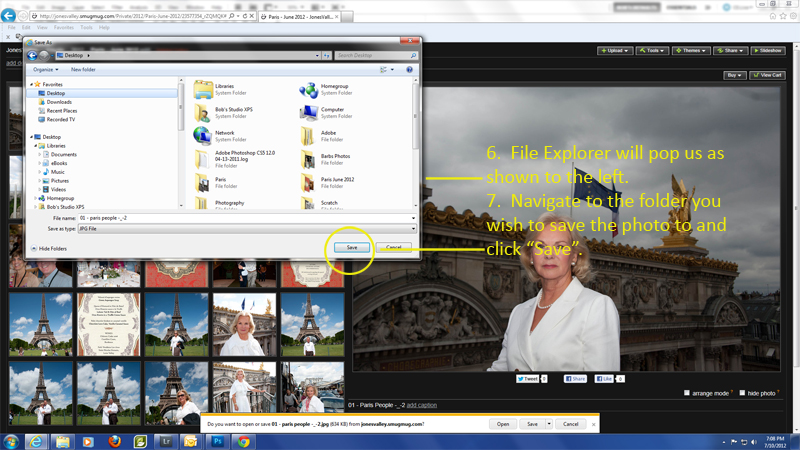
The great news is that you can download your own hi-resolution copy of any of these images. Here's how.